Now, it's not really a car modeling tutorial. But it is a reference for lots and lots car tutorials.
Some time ago I've decided to model a car. Nothing in particular, just a regular car. And since this seemed to be a somewhat complicated task, I've decided that this time I should find a good step – by - step tutorial that will allow me to create my car easily.
After a short search I found a Car Body Design , a cool site where you can find different car tutorials for almost any software, whether it is a 2d illustration or a 3d render. There are tuts for beginners, tips on modeling or sketching, tips on setting the blueprints and final rendering.
For my first model I chose a really nice green Mazda RX8 tutorial and I promise to post my final result as soon as it's finished.
So for those of you who learn how to create a car – this site is for you.
Have fun and good luck.
Showing posts with label 3ds Max. Show all posts
Showing posts with label 3ds Max. Show all posts
Friday, June 5, 2009


Saturday, September 27, 2008
Making of a Five Point star
1. Create a Cylinder on a top view.
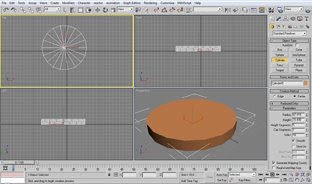
2. Go to a modify panel and change the parameters as shown on the image below.
Don't forget to make the object red - 255, 0, 0.
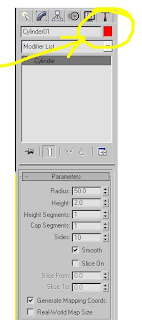
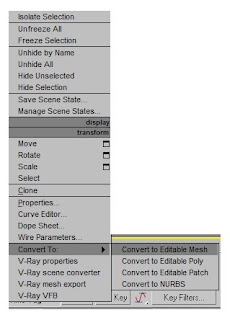
4. With a cylinder chosen right click on it and choose Convert to: Convert to Editable Mesh.
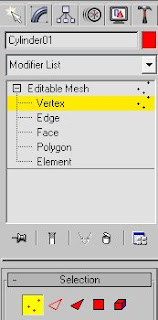
5. On a Modify panel choose Vertex sub-object in Sub-Material menu.
6. Go to a Top View and press Ctrl on your keyboard. Choose every second vertex of a cylinder perimeter by dragging your mouse.
7. Choose select and Uniform scale. Drag chosen vertexes to the center and make it a look like a star.
Important: Do it exactly as shown on image.
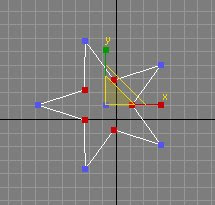
8. Go to the Top view to choose the center vertex.
9. Press Ctlr on your keyboard to move to the Front view.
10. Release the Ctlr and Scale it on the Y axle in the Front View.
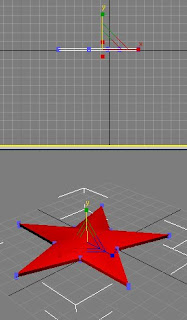
11. Hit Render (F9)

The star is ready.

2. Go to a modify panel
 and change the parameters as shown on the image below.
Don't forget to make the object red - 255, 0, 0.

4. With a cylinder chosen right click on it and choose Convert to: Convert to Editable Mesh.

5. On a Modify panel choose Vertex sub-object in Sub-Material menu.

6. Go to a Top View and press Ctrl on your keyboard. Choose every second vertex of a cylinder perimeter by dragging your mouse.
7. Choose select and Uniform scale. Drag chosen vertexes to the center and make it a look like a star.
Important: Do it exactly as shown on image.

8. Go to the Top view to choose the center vertex.
9. Press Ctlr on your keyboard to move to the Front view.
10. Release the Ctlr and Scale it on the Y axle in the Front View.

11. Hit Render (F9)

The star is ready.
Tuesday, August 19, 2008
How to make your object glow
One of my students came to me with a project that included some neon light in her interior.
Since I had no idea how to make a neon effect, I, as always, started the search. Among those simulating the neon effect I ran into this simple tutorial that allows you to Make the object glow.

I did learn the technique and found it really useful while making this Christmas tree.
See how the decorations glow? Nice, huh?
If you'd like to learn how to make such a tree – you are welcome to go to this Making of a Christmas tree tutorial.
Have fun :)
Since I had no idea how to make a neon effect, I, as always, started the search. Among those simulating the neon effect I ran into this simple tutorial that allows you to Make the object glow.

I did learn the technique and found it really useful while making this Christmas tree.
See how the decorations glow? Nice, huh?
If you'd like to learn how to make such a tree – you are welcome to go to this Making of a Christmas tree tutorial.
Have fun :)
Monday, May 19, 2008
Making of a Red Glowing Heart
Making of a Heart
1. Create a box in a Top View.
2. Go to Modify panel and change its parameters to:
L 30; W 65; H 80;
L Seg. 2, W Seg.2, H Seg 3.

3. Convert (right click) to Editable Poly.
4. Start moving the Vertexes until you create a Heart-like shape that would look something like this.

5. While the Vertexes are still chosen, go to Subdv. Surface list and check Use NURMS Sbdv: Display - Iterations : 2.
The Heart model will immediately become much smoother than before.
6. For Extra smoothness you can choose a MeshSmooth Modifier and set it to - Iterations : 2.

And now for the Material part.
7. Press M on your keyboard and choose an empty slot.
8. Choose a Translucent Shader. Choose Red (255, 0, 0) for Diffuse and another Red (248, 18, 18) in Translucent clr.
Leave the other parameters as they are.

9. Press 8 to change the Environment background for White.

10. Press F9 to render.

That’s it. Hope you enjoyed it.
Thursday, May 15, 2008
3ds Max – a Modifiers war: Loft VS Lathe!!
A couple of days ago I was browsing through Tutorialized and and found this amazing Umbrella tutorial for 3ds Max. Very simple yet very informative, it offers another – and I'd dare say – more creative way of modeling.
I actually did model an umbrella, but on the way I realized that a second part of this tutorial is a perfect way to model many other things.

So I've made this Wooden Candle Stick.
It took me about 15 minutes to make it (sounds like a part of a 5 min cake recipe) – no prior sketches, just playing with dots.
I could, of course, use Spline + Lathe Modifier, but this way was more fun.
To model a Candle itself I highly recommend to used this Candle Video tutorial – but you must register before you download the video.
I actually did model an umbrella, but on the way I realized that a second part of this tutorial is a perfect way to model many other things.

So I've made this Wooden Candle Stick.
It took me about 15 minutes to make it (sounds like a part of a 5 min cake recipe) – no prior sketches, just playing with dots.
I could, of course, use Spline + Lathe Modifier, but this way was more fun.
To model a Candle itself I highly recommend to used this Candle Video tutorial – but you must register before you download the video.
Making of Wooden Candle Stick with 3ds Max
Today we will create a Wooden Candle Stick using a simple method of Loft Scaling.

1. Go to Create panel: Shapes and draw a line in Front view and Circle in Top view.
Choose Line and go to Rendering Drop Down list to change Radial Sides to 20.

2. Choose Circle and go to Create: Compound objects: Loft
3. In Creation Drop Down list choose Get Path and choose Line.

And now the fun part begins!
4. Choose the figure you’ve just created.
5. Go to Modify panel. In Deformation Drop Down list go to Scale.
6. Explore the Scale Deformation(x) window and start adding, moving and deleting points.

After I finished modeling my Candle Stick the Scale Graph looked like this.

7. For Wooden material press M and use these settings.

8. Add 3 Omni lights around your model and adjust its parameters.
Hope you enjoyed this tutorial.

1. Go to Create panel: Shapes and draw a line in Front view and Circle in Top view.
Choose Line and go to Rendering Drop Down list to change Radial Sides to 20.

2. Choose Circle and go to Create: Compound objects: Loft
3. In Creation Drop Down list choose Get Path and choose Line.

And now the fun part begins!
4. Choose the figure you’ve just created.
5. Go to Modify panel. In Deformation Drop Down list go to Scale.
6. Explore the Scale Deformation(x) window and start adding, moving and deleting points.

After I finished modeling my Candle Stick the Scale Graph looked like this.

7. For Wooden material press M and use these settings.

8. Add 3 Omni lights around your model and adjust its parameters.
Hope you enjoyed this tutorial.
Monday, October 8, 2007
Creating Gold material with 3DS MAX
Gold material? Easy!!
The first step is to create an object.
Let’s make a simple sphere - radius 30.
Press M for materials to set things up.
First change the Diffuse color to Dark brown - 69, 47, 0
Then – Specular to yellowish - 230,199,91
Set the Specular Level to 191
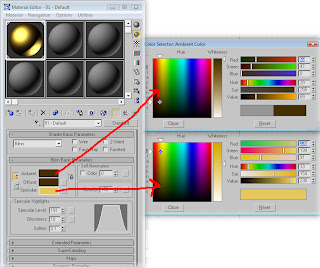
If you render it now – F9 – you could see that it has a slight resemblance of something that could be gold, but it’s not. Yet.
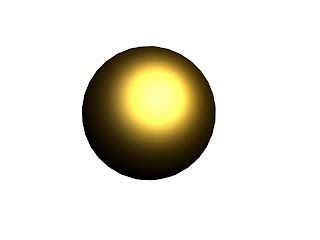
The next step is to go to Maps menu.
Check Reflection and choose Swirl map.
Change Base color for 165, 144, 0 and Swirl color for 0,0,0 – Pure black.
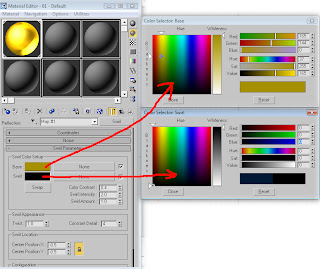
Hit render.
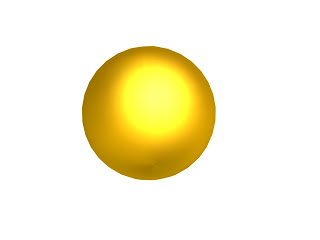
You will probably have some separation line in the center of your sphere.
In Coordinates change Blur offset from 0 to 1.
Render.
Congrats! You’ve got your Gold material.
The first step is to create an object.
Let’s make a simple sphere - radius 30.
Press M for materials to set things up.
First change the Diffuse color to Dark brown - 69, 47, 0
Then – Specular to yellowish - 230,199,91
Set the Specular Level to 191
If you render it now – F9 – you could see that it has a slight resemblance of something that could be gold, but it’s not. Yet.
The next step is to go to Maps menu.
Check Reflection and choose Swirl map.
Change Base color for 165, 144, 0 and Swirl color for 0,0,0 – Pure black.
Hit render.
You will probably have some separation line in the center of your sphere.
In Coordinates change Blur offset from 0 to 1.
Render.
Congrats! You’ve got your Gold material.
Subscribe to:
Posts (Atom)