Monday, May 19, 2008

Making of a Red Glowing Heart

Making of a Heart


1. Create a box in a Top View.
2. Go to Modify panel and change its parameters to:
L 30; W 65; H 80;
L Seg. 2, W Seg.2, H Seg 3.
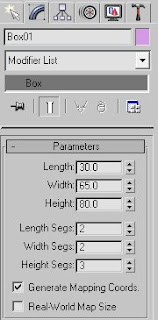


3. Convert (right click) to Editable Poly.
4. Start moving the Vertexes until you create a Heart-like shape that would look something like this.
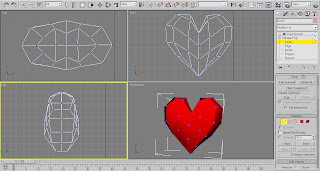


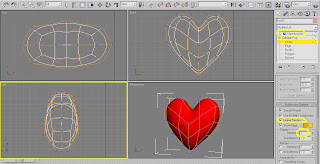
5. While the Vertexes are still chosen, go to Subdv. Surface list and check Use NURMS Sbdv: Display - Iterations : 2.
The Heart model will immediately become much smoother than before.

6. For Extra smoothness you can choose a MeshSmooth Modifier and set it to - Iterations : 2.


And now for the Material part.
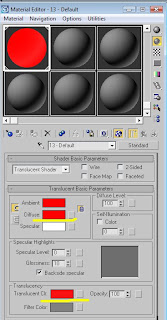
7. Press M on your keyboard and choose an empty slot.
8. Choose a Translucent Shader. Choose Red (255, 0, 0) for Diffuse and another Red (248, 18, 18) in Translucent clr.
Leave the other parameters as they are.


9. Press 8 to change the Environment background for White.
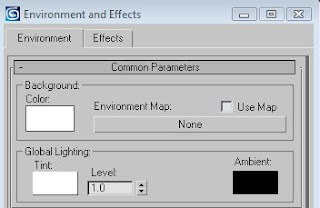


10. Press F9 to render.

That’s it. Hope you enjoyed it.

Thursday, May 15, 2008

3ds Max – a Modifiers war: Loft VS Lathe!!

A couple of days ago I was browsing through Tutorialized and and found this amazing Umbrella tutorial for 3ds Max. Very simple yet very informative, it offers another – and I'd dare say – more creative way of modeling.

I actually did model an umbrella, but on the way I realized that a second part of this tutorial is a perfect way to model many other things.


So I've made this Wooden Candle Stick.

It took me about 15 minutes to make it (sounds like a part of a 5 min cake recipe) – no prior sketches, just playing with dots.
I could, of course, use Spline + Lathe Modifier, but this way was more fun.

To model a Candle itself I highly recommend to used this Candle Video tutorial – but you must register before you download the video.

Making of Wooden Candle Stick with 3ds Max

Today we will create a Wooden Candle Stick using a simple method of Loft Scaling.

1. Go to Create panel: Shapes and draw a line in Front view and Circle in Top view.

Choose Line and go to Rendering Drop Down list to change Radial Sides to 20.


2. Choose Circle and go to Create: Compound objects: Loft
3. In Creation Drop Down list choose Get Path and choose Line.


And now the fun part begins!

4. Choose the figure you’ve just created.
5. Go to Modify panel. In Deformation Drop Down list go to Scale.
6. Explore the Scale Deformation(x) window and start adding, moving and deleting points.


After I finished modeling my Candle Stick the Scale Graph looked like this.


7. For Wooden material press M and use these settings.


8. Add 3 Omni lights around your model and adjust its parameters.

Hope you enjoyed this tutorial.

Tuesday, May 6, 2008

Let there be 3D!!!!!

This blog is to become a collection of links that are related to theoretical and practical applications of Computer Graphics and Animation, including tutorials, galleries, articles and sites. Since I was (and still am) eager to know as much as possible about 3D CG, I created my own list of essential CG info resources. As my list was growing, I found it equally hard to find the necessary material either on web or my computer. So the main purpose of this blog is to create a collection of all the info that I ever found useful (for me) without the need to search for it whenever I decide to use it again.

The first link will lead you to Tutorialized, a well known website providing all-kind and all-level tutorials including 2&3D graphics, web design, video editing, programming and many more. Since I'm basically self taught (except a short course in college), I practically (still) live there. If you're not familiar with this site, check it out. And if you're new to CG – this one is made for you.