...The idea of creating my own tutorials came when I realized I couldn’t always find the info I needed online. So I've decided that the best way to overcome this challange is to start creating those “missing” tutorials myself. Here you will find many simple and original tutorials for 3ds max and Illustrator. I hope these cuties will help you in your own projects and will answer some of your questions... Have fun! Dalia
Sunday, October 26, 2008
Making of Halloween pumpkin with 3ds Max – Part 1: The basics
Halloween is coming so it is time to model some pumpkins!
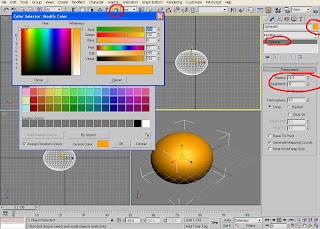
1. To make one you should first create a simple Sphere. In a Modifier panel change its radius to 50 and Segments to 32. Make it a nice orange color (252, 160, 0). You can Scale it a bit, so it doesn’t look like a ball.
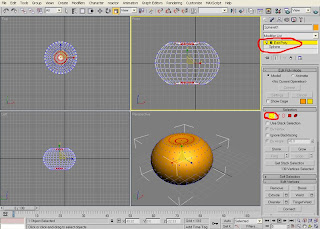
2. Go to a Modifier list and choose Edit Poly: Vetex Sub-Object.
3. In a Front View choose the upper and the bottom vertexes and scale them inside – as shown on the image. Repeat it twice.
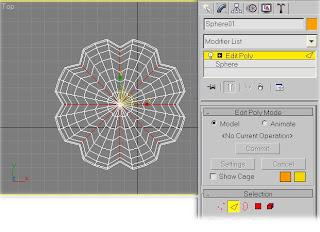
4. Now on the Top View choose every forth Edge and Loop them (ALT+L). Then go to scaling and pull these Edges inside.
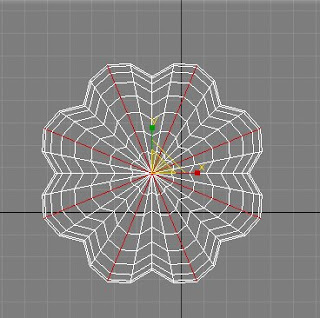
5. Now chose Edges as shown on image and Scale them outside.
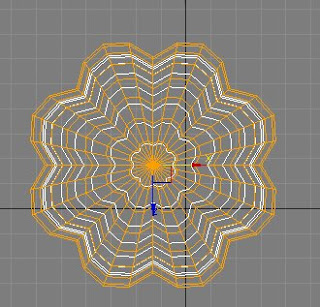
6. Make a copy of this model and scale it to be a bit smaller. Move it aside for a while.
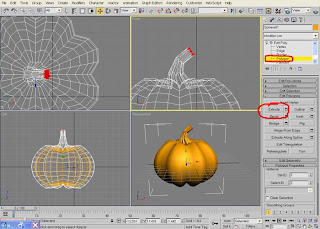
7. Choose upper Polygons of the Bigger form and extrude them up to make a pumpkin steam. If it's too straight, connect Edges and move some Vertexes.
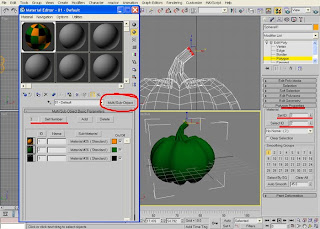
8. Press M on your keyboard and choose an empty slot. In a Material/Map browser choose Multi/Sub-object.
9. Change Set Numbers to 3 since you will use 3 colors – orange (255, 132, 0), green (0, 98, 12) and black (0, 0, 0). You will notice that each color has it's ID - we will use it soon.
10. Apply materials to your pumpkin - orange body and green steam. If there is some mixture in colors go back to Modifier panel and scroll down to Polygon Properties. Choose separately body polygons and set the Material ID's accordingly to the Material settings ID.
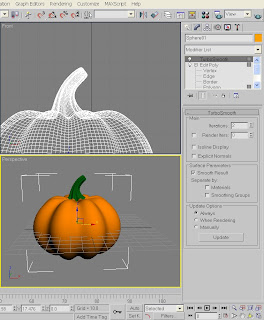
11. In a Modifier panel choose TurboSmooth to make our pumpkin smoother.
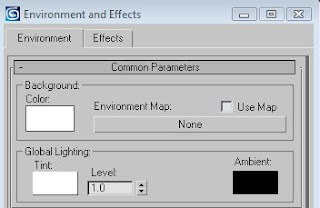
12. Change the background to white (8 on Keyboard) and Hit Render (F9).
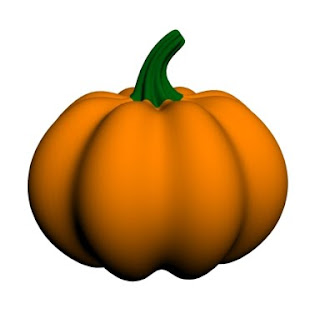
The Basic pumpkin is ready.
Hope you found this tutorial useful.
If you have any question regarding it - feel free to ask.
Wednesday, October 15, 2008
VRay for 3ds Max: What is it and how it works.
VRay is the engine that makes your scene looks realistic. It is the magic that makes it look really great. It is the final touch of your amazing render.
But in order to make this magic work – it, of course, must be mastered.
While I was looking for ways to make my renders to look better, I mostly ran into the "read and do" tutorials. They guide you through the settings step by step but don't really explain what each of the settings and buttons actually do. Now don't get me wrong, these tutorials are great and usually work for me, but at times I felt really frustrated for not getting a more detailed explanation about how things work on a deeper level.
So I kept digging and searching for something to give me a true knowledge about this engine.
And you know what? I found what I was looking for.
I found two sites that give you a full explanation about how the VRay engine works.
The first one is VRayElite where Joe Pizzini gives an overview on all the settings. If you click the images you will find an official VRay manual with ALL the theoretical info.
Another site is Aversis where everything is explained in a very simple and understandable language. The writer also gives you some useful tips for the effective usage of these.
On both of these sites you will find some wonderful "read and do" tutorials.
Don't skip them.
Tuesday, October 7, 2008
Making of a Christmas Tree
Christmas is coming soon so I decided to create a simple, a bit abstract, but a very cool Christmas tree.
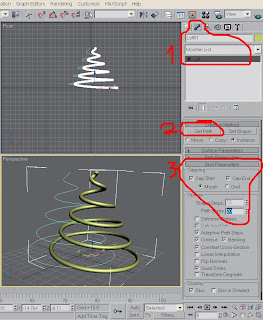
1. To create a Christmas tree we must first create its base which will be made of a Helix and a Circle.
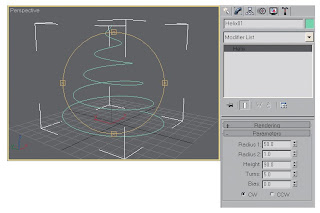
To do that go to a Creation panel: Shapes and create a Helix in a Top view.
2. In a modify panel change its parameters as shown on the image to get this result. (50,1,90,5)
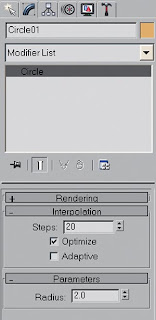
3. Go back to Creation panel: Shapes to create a circle in a front view.
In a modify panel change go to Parameters to change its radius to 2 and its Interpolation Steps to 20 to make it smoother.
4. Change its parameters in status bar also.
Now we're going to put these two together.
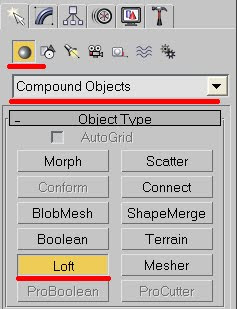
5. Choose Circle; go to Geometry - Compound objects and choose Loft.
6. Next choose Get path and then – back to choose the helix.
7. You can see that our base is a little bit edgy. To make it smoother choose the tree base again and go to a Modify list. Choose Skin Parameters menu and change Shape steps to 10 and Path steps to 20.
The base for our Christmas tree is ready.You can move Helix and circle aside so they won't make be a distraction.
And now the fun part begins because we're going to add some spikes to it.
8. Change the base color to dark green.
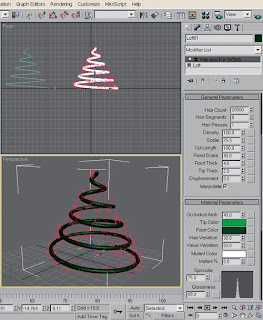
9. Choose your tree, go to a Modify Panel and choose a Hair and Fur from the modifier list – or press H on your keyboard.
10. On a dropdown menu Choose General parameters and start changing them. You can change the hair number with Count - 20000, its length with Scale - 25, its thickness with its Root - 4 and Tip Thick - 2.
11. To make the tree green go to Material Parameters menu and change a tip color to light green and root color to dark green.
12. Press 8 on your keyboard to change a Background Color to white.
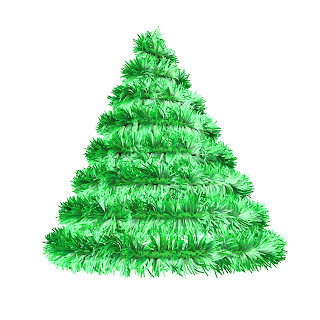
13. Hit F9 to render. It might take some time – so be patient.
Any changes you wish to make - from Helix and Circle to Hair and fur parameters – you can. Any change will instantly appear.
That’s it for the tree part.
Hope you found this tutorial useful.
If you have any questions regarding this tutorial - don't hesitate to ask here.
Saturday, September 27, 2008
Making of a Five Point star
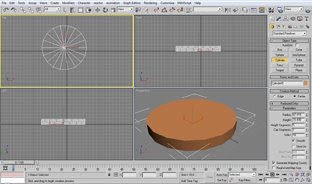
1. Create a Cylinder on a top view.
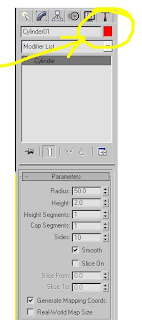
2. Go to a modify panel and change the parameters as shown on the image below.
Don't forget to make the object red - 255, 0, 0.
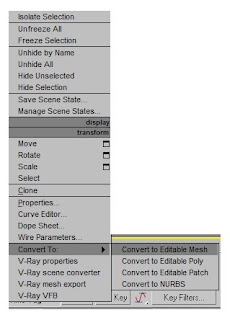
4. With a cylinder chosen right click on it and choose Convert to: Convert to Editable Mesh.
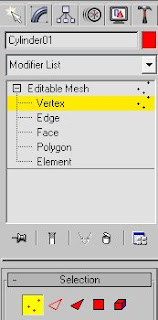
5. On a Modify panel choose Vertex sub-object in Sub-Material menu.
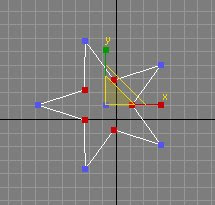
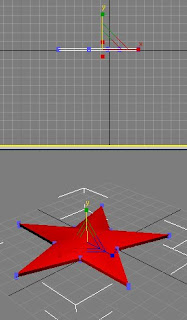
6. Go to a Top View and press Ctrl on your keyboard. Choose every second vertex of a cylinder perimeter by dragging your mouse.
7. Choose select and Uniform scale. Drag chosen vertexes to the center and make it a look like a star.
Important: Do it exactly as shown on image.
8. Go to the Top view to choose the center vertex.
9. Press Ctlr on your keyboard to move to the Front view.
10. Release the Ctlr and Scale it on the Y axle in the Front View.
11. Hit Render (F9)
The star is ready.
Tuesday, August 19, 2008
How to make your object glow
One of my students came to me with a project that included some neon light in her interior.
Since I had no idea how to make a neon effect, I, as always, started the search. Among those simulating the neon effect I ran into this simple tutorial that allows you to Make the object glow.
I did learn the technique and found it really useful while making this Christmas tree.
See how the decorations glow? Nice, huh?
If you'd like to learn how to make such a tree – you are welcome to go to this Making of a Christmas tree tutorial.
Have fun :)
Monday, May 19, 2008
Making of a Red Glowing Heart
Making of a Heart
1. Create a box in a Top View.
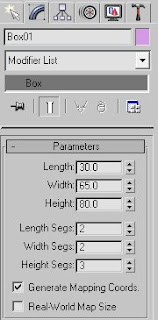
2. Go to Modify panel and change its parameters to:
L 30; W 65; H 80;
L Seg. 2, W Seg.2, H Seg 3.
3. Convert (right click) to Editable Poly.
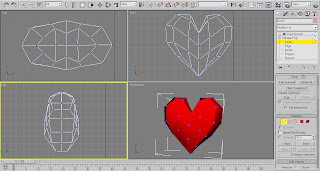
4. Start moving the Vertexes until you create a Heart-like shape that would look something like this.
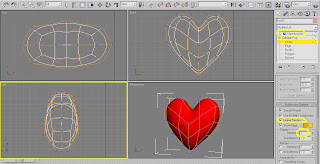
5. While the Vertexes are still chosen, go to Subdv. Surface list and check Use NURMS Sbdv: Display - Iterations : 2.
The Heart model will immediately become much smoother than before.
6. For Extra smoothness you can choose a MeshSmooth Modifier and set it to - Iterations : 2.
And now for the Material part.
7. Press M on your keyboard and choose an empty slot.
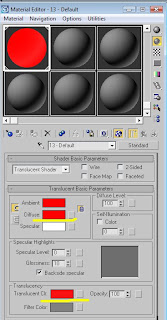
8. Choose a Translucent Shader. Choose Red (255, 0, 0) for Diffuse and another Red (248, 18, 18) in Translucent clr.
Leave the other parameters as they are.
9. Press 8 to change the Environment background for White.
10. Press F9 to render.
That’s it. Hope you enjoyed it.
Thursday, May 15, 2008
3ds Max – a Modifiers war: Loft VS Lathe!!
A couple of days ago I was browsing through Tutorialized and and found this amazing Umbrella tutorial for 3ds Max. Very simple yet very informative, it offers another – and I'd dare say – more creative way of modeling.
I actually did model an umbrella, but on the way I realized that a second part of this tutorial is a perfect way to model many other things.
So I've made this Wooden Candle Stick.
It took me about 15 minutes to make it (sounds like a part of a 5 min cake recipe) – no prior sketches, just playing with dots.
I could, of course, use Spline + Lathe Modifier, but this way was more fun.
To model a Candle itself I highly recommend to used this Candle Video tutorial – but you must register before you download the video.
Making of Wooden Candle Stick with 3ds Max
Today we will create a Wooden Candle Stick using a simple method of Loft Scaling.
1. Go to Create panel: Shapes and draw a line in Front view and Circle in Top view.
Choose Line and go to Rendering Drop Down list to change Radial Sides to 20.
2. Choose Circle and go to Create: Compound objects: Loft
3. In Creation Drop Down list choose Get Path and choose Line.
And now the fun part begins!
4. Choose the figure you’ve just created.
5. Go to Modify panel. In Deformation Drop Down list go to Scale.
6. Explore the Scale Deformation(x) window and start adding, moving and deleting points.
After I finished modeling my Candle Stick the Scale Graph looked like this.
7. For Wooden material press M and use these settings.
8. Add 3 Omni lights around your model and adjust its parameters.
Hope you enjoyed this tutorial.
Tuesday, May 6, 2008
Let there be 3D!!!!!
This blog is to become a collection of links that are related to theoretical and practical applications of Computer Graphics and Animation, including tutorials, galleries, articles and sites. Since I was (and still am) eager to know as much as possible about 3D CG, I created my own list of essential CG info resources. As my list was growing, I found it equally hard to find the necessary material either on web or my computer. So the main purpose of this blog is to create a collection of all the info that I ever found useful (for me) without the need to search for it whenever I decide to use it again.
The first link will lead you to Tutorialized, a well known website providing all-kind and all-level tutorials including 2&3D graphics, web design, video editing, programming and many more. Since I'm basically self taught (except a short course in college), I practically (still) live there. If you're not familiar with this site, check it out. And if you're new to CG – this one is made for you.
Subscribe to:
Posts (Atom)