![](https://blogger.googleusercontent.com/img/b/R29vZ2xl/AVvXsEg0tR11HS4bHhn_QnBQpiymrTU6Uoo0PjYQ1gmaxJX8mOPPdY4BhinRIvfMsgu8k046T2wSxgmuKDiooaCh1hcbfR0dQ78buVnuSFV0BzBKbH0taCmPZl3eXSyvh1qZoGcIyls_YCiqEXk4/s320/creating+a+card+-+1+small.jpg)
In Part 2 we will be creating a Valentine card itself using the Heart image we created in Part 1 .
![](https://blogger.googleusercontent.com/img/b/R29vZ2xl/AVvXsEg48bQU_f1vso7TNclUYDA6KN8LCTJwMy8fRe_mZLUNeohYQrlvMFOu8RQXGGwaDZVmFwBdsUIXEbzYg8_1JYbO1HCn9cBOE7hGeeOPPxjfYePHXMC7kFYyRGvMFhXFHPkawCFYw5iMiY4L/s320/1+-+heart+A-Group+copy.jpg)
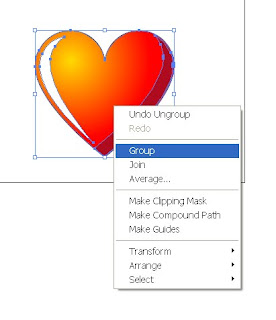
1. Place the heart you created in Part 1 of this tutorial on a new document and group it (Ctrl +A, right click - Group).
![](https://blogger.googleusercontent.com/img/b/R29vZ2xl/AVvXsEgHRzSnXhzfLk5I6EE52s5hiYlRgXgtgyKZ8w_ePQB_mZ-0NsKzH4bH9DHVykIkxdr76BUMScEcFf_Yg7gbT0hksfkJSZ069RToLt7qqjiF4TDj6fk_7oI4uTAk3w22Se0aJHu2XYI_Re0X/s320/2heart+-+Lock+and+Hide.jpg)
2. Create a new layer and copy paste a heart on it. Lock and hide it for now.

![](https://blogger.googleusercontent.com/img/b/R29vZ2xl/AVvXsEiGTZbtB42269WMjMNAxpI-6EHcq_df0JAZ2DmSouVwBThVJZklbRLeC7XrDOKSXRC88JaKZfa5mOXEV1w0J12OpvwBwoDWTnwAstyfiK3aIp25fuWJsNudXVt0vSiB2-EQ17s3angIoCe0/s320/3+heart+-+Move+group+%2B+Duplicate.jpg)
3. Duplicate a visible heart a few times and place and transform it as shown - you don't have to be precise.
4. Choose this group, make it smaller and place in the upper left corner of your document. Duplicate it (Alt + drag) so it fills our working space.
![](https://blogger.googleusercontent.com/img/b/R29vZ2xl/AVvXsEia2dGvuVG4umEpy_Jq9O0_pu3bg2IDkKuBa9VLK9DiaejFekG-2y6CUtl0vBd8JmJ-6AA1n3MCtkrr9gMqygLNEVk6ug30GTh8X_fHD9hjH-hhqZv3UcXoInnC5HwIAvy9kbqFalje3MsX/s320/4+Heart+-+Trabsform+Each.jpg)
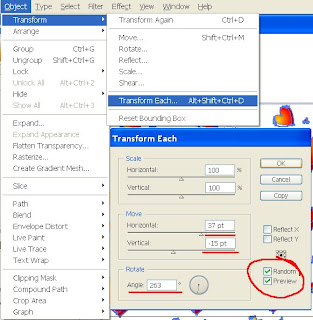
5. Choose all hearts (Ctrl +A) and go to Object – Transform – Transform each.
6. First check Random and Preview so you could see all the changes you're making.
Play with the settings a bit. I suggest you make some manual changes after this step to spread it a little bit more.
7. Add a new layer above this one. Create a rectangle to completely cover the spread hearts. Fill it with bright pink corol(0, 9, 100).
![](https://blogger.googleusercontent.com/img/b/R29vZ2xl/AVvXsEio6OCN7Etne7L3ku9iUZ36lnMOhb_PP8Sm6YnzwtWiLSUBvVWuNZiEixjm0koxP9xbZv9s_hvOhVQ36xiGEpjc0inKTUS74S06NFmOQ-XLQqXKtQD_l0g79AgzMMZ7OMX7v-omDyqlKBmG/s320/6+heart+-+Transparecy+-+Screen.jpg)
8. Go to Transparency window and choose Screen.
![](https://blogger.googleusercontent.com/img/b/R29vZ2xl/AVvXsEg0tR11HS4bHhn_QnBQpiymrTU6Uoo0PjYQ1gmaxJX8mOPPdY4BhinRIvfMsgu8k046T2wSxgmuKDiooaCh1hcbfR0dQ78buVnuSFV0BzBKbH0taCmPZl3eXSyvh1qZoGcIyls_YCiqEXk4/s320/creating+a+card+-+1+small.jpg)
9. Unlock the Heart layer and place it above the others. Duplicate and place as shown – or as you wish.
10. To write a personal greeting press T on your keyboard and start writing. To change size and font go to Type – Size/Font.
That’s it.
Happy Valentine!!!
If you have any question regarding this tutorial - don't hesitate to post it.
2 comments:
u dont know how much this tut has improved my skills...thanks a lot and plis plis kip more flowing...
I am so glad to hear that :)
I promise to publish more of those :)
Post a Comment